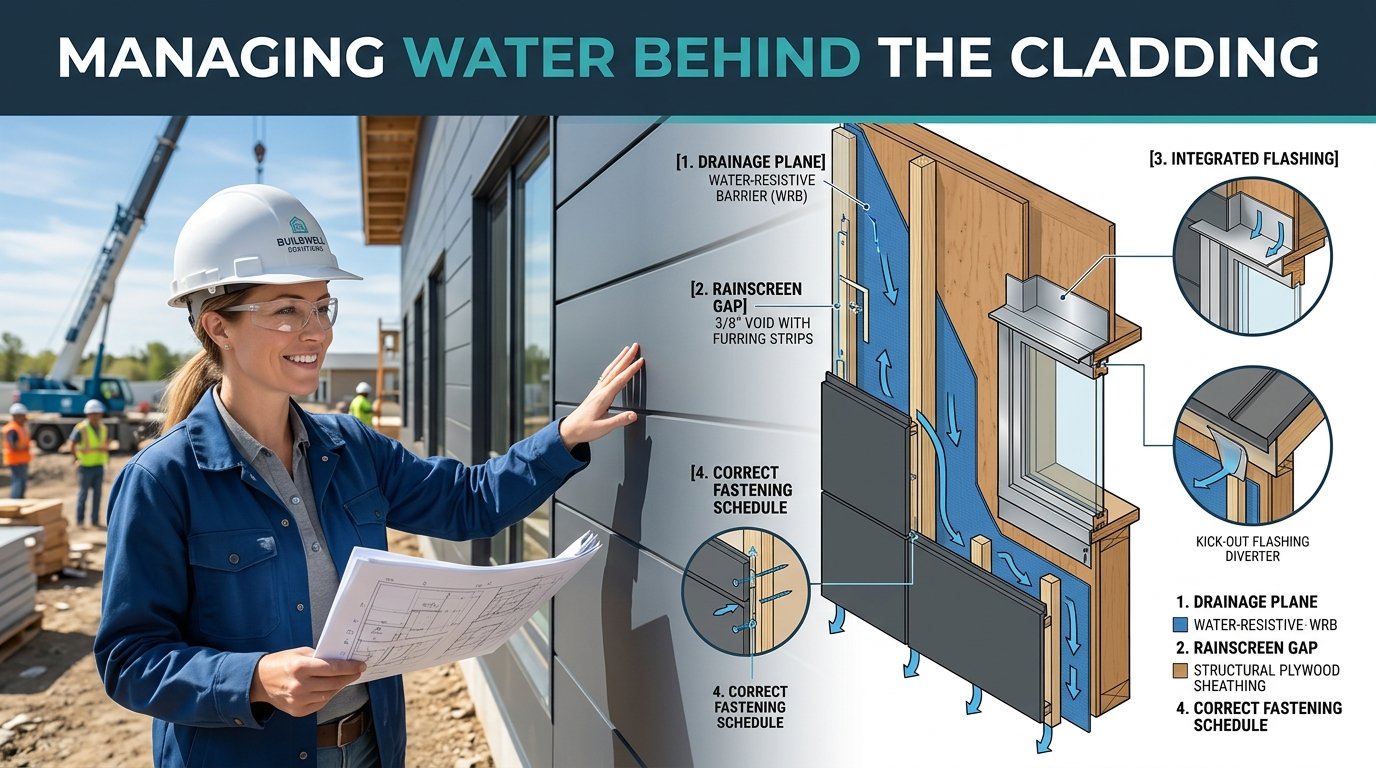
How does professional siding installation protect a home?
Managing water rather than excluding it
Even the best of cladding will leak some. Water will penetrate through the butts of joints, between the fastener heads and pass up the back of lap siding by capillary action. All of this can be stopped at the point where it enters the wall by deflecting it, draining it and allowing it to dry. The materials in the wetting zone must also be able to tolerate the normal cycle of wetting and drying.
The concept of how one treats a water-resistive barrier when installing a wall is greatly altered when one understands that a water-resistive barrier is a drainage plane and not a membrane. The main function of a house wrap is to allow water that penetrates the siding to drain down to the bottom of the wall and to exit at the lowest point.
Where the drainage plane terminates
The weakest link in the cladding system is the terminations. While the field may perform for long periods of time, wall terminations can fail at any time. The bottom of the wall must have an exit for water that penetrates the wall, often in the form of a starter strip or flashing. This must project out from the foundation with a drip edge, and the water-resistive barrier must lap over this. Clearance to finished grade, hardscape and roof-to-wall junctions must be 6 inches (150mm) or greater, 2 inches (50mm) or greater above hardscape and 1-2 inches (25-50mm) at roof-to-wall junctions to ensure that cut edges of cladding are never in standing water or subject to splash.
Stage sequencing and where protection is won
BUT FIRST IT HAS TO BE INSTALLED IN THE CORRECT ORDER. A so-called head flashing installed on top of the house wrap instead of down below will channel all water into the sheathing for the rest of the wall’s existence.
| Stage | Detail that controls performance | Common failure mode |
|---|---|---|
| Tear-off and sheathing review | Probing for soft sheathing and rot at sills and openings | New cladding installed over compromised substrate |
| Rough opening prep | Sloped or back-dammed sill pan installed before the window | Sill sealed with caulk only, no drainage path |
| Water-resistive barrier | Shingle-fashion laps, horizontal over vertical, taped seams | Reverse laps at wall transitions and band joists |
| Flashing integration | Head and transition flashing lapped under the upper barrier course | Flashing taped over the wrap |
| Cladding and trim | Fastening schedule, clearances, movement allowance | Overdriven or short fasteners, tight butt joints |
| Sealant and final review | Sealant used only at vertical joints, never at bottom edges | Drainage paths sealed shut |
Why openings come first
If rough openings are ready to install cladding, then install the head flashing between the barrier and the exterior cladding and check the lapping of jamb and sill flashing in both directions. Don’t cut and patch the barrier to wrap around the opening and rely on tape to manage water that penetrates the structure after installation.
Underlayment and the gap behind the panel
House wrap is available in several configurations including mechanically attached, self-adhered, and even integrated into the sheathing as a barrier. Each of these choices needs to be suited to the remainder of the wall assembly and selected to provide the proper amount of permeance to allow drying. The various choices must also be able to be penetrated by fasteners without loss of performance. A wall containing exterior foam, for example, requires a drying direction. The choice of a barrier to be used in the wall must consider the entire wall assembly to avoid trapping moisture in the sheathing.
When a rainscreen earns its depth
An air space of 3/8″ or more is required for cavity batt walls to create a capillary break, for drainage and for air flow. Almost all absorptive cladding such as wood would require this as well as walls subject to high rainfall and exposed to the coastal weather. Because wind-driven rain loads vary so much from one region to the next, it is worth asking a crew that handles siding installation in Charlotte to size the air space around local exposure rather than a dry interior climate standard.
Flashing details that determine the outcome
For the majority of moisture claims to a building envelope, the cause of the problem can be traced back to a few simple junctions within the wall.
-
Kick-out flashing where a roof edge meets a sidewall, sized to divert water into the gutter rather than behind the cladding
-
Z-flashing at horizontal panel transitions and above trim bands
-
Head flashing over windows and doors with end dams and a drip leg
-
Deck ledger flashing with a continuous barrier behind the ledger board
-
Sealed blocks or split blocks at hose bibs, lights, dryer vents, and electrical penetrations
Sealant is a secondary defense
Sealant has a service life that is typically less than that of the siding, and thus is generally best reserved for use in vertical joints and perimeter corners where a flashing is already doing most of the water protection. Leave the bottom of the siding and weep holes open and unsealed.
Fasteners, clearance, and movement
Dimensional change (in trim and siding material) is the hidden cause of cracked siding and buckled panels. Vinyl siding needs to be installed with center-of-slot nailing, with about 1/32″ of play between the nailing hole center and the fastener’s standing pilot (or shank). Moderate weather requires about a quarter of an inch of end clearance at corners and other trim locations. In cold weather, however, this can be increased to as much as half an inch or more.
Checks before close-in
Take photos of the way the barrier laps, how the flashings relate to the exterior surface of the barrier, and how much clearance is between the exterior of the exterior cladding layer and any hardscape or other exterior elements before the exterior surface is covered up by the exterior cladding layer. Those photos are the best evidence of any work performed on the exterior of a house and prove the proper work was done against any later claim regarding the failure of the exterior of said house.